I was at Michael’s Arts and Crafts and they had a bin of wooden letters on clearance. They were all mismatched and I couldn’t find a K for the life of me! I kept digging and settled on a J. I had gotten an idea shortly after seeing the clearance bin and was not going to discard it! As I was checking out, I was standing in that section where they have all of the useless crap that nobody needs but that we all buy because it’s like 23 cents, you know that spot. Anyway, I was resisting a bag of likely incredibly old circus peanuts and low and behold, a K!!!! So, I picked that bad boy up and here we are!
I wanted to use more of my grandma’s buttons. I’ve become fixated on these things and I cant stand for them to be in a drawer! This time, I stayed in neutral and earth tones. I even used a few odds and ends like an old safety pin and half a snap. My grandma would have been SO into my blog. Seriously, she would have loved this shit. The sun catcher that I made a few weeks back would have evoked a response like “Oh, Jenny! That mobile looks so good with all of your junky stuff!” No shit, she really said that when she visited my first apartment, and I took it as a great compliment! She was the queen of “junky stuff”! The woman saved EVERYTHING. I mean seriously, you haven’t lived until you’ve helped you grandma rinse plastic bags and hung them on a variety of wooden utensils to dry! She passed along the idea that things should have more than one life and more than one use and she was the master of appreciating the simplest things. This is the simple and unadulterated joy I get from her buttons.
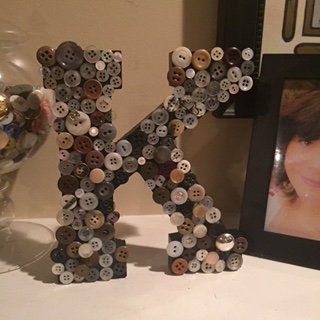
For this project, I used a wooden letter that is about eight inches tall and is able to be stood up on it’s own. You can buy the kind that hang on the wall or the heavy cardboard kind. Any sturdy letter that strikes your fancy. I used my grandma’s buttons but you could use found objects like seashells, pebbles, mismatched vintage jewelry… whatever makes you feel happy! 
Cover a few inches of the surface of your letter to start, with some basic craft glue. Don’t cover the entire thing at once so you can have enough time to work without the glue becoming dry or crumbly.
 Begin to add your objects to the gluey area. You could make a pattern or just be random about it.
If you are using a free standing letter, be sure not to allow the buttons to go past the bottom edge to ensure proper standing. Once completely covered, allow to lay flat until completely dry.
 Voila! A lovely little monogram! You can do this project with your kids too! So easy and each letter can be as unique as you are! Enjoy!